Pinewood Derby Speed Tips
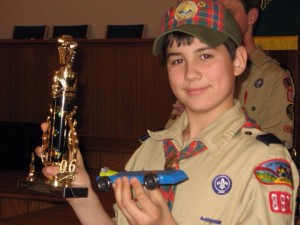
Take a look at the kid’s expression in the picture below. That happens to be my son, who, several years back, won first place in his Cub Scout Pack for the Pinewood Derby Race.
Now flash back a few years from our big win, and you would have seen the opposite expression. Yes, our first race ended with weeping, wailing and the gnashing of teeth. As the old Hee Haw song goes–blue and despair and agony on me. I realized then and there that Pinewood Derby was a big deal and a potential learning opportunity for me and my son.
So if you’re new to Cub Scouts and Pinewood Derby races, I hope these 18 Pinewood Derby speed tips will make your efforts easier and your chances of winning a trophy, greater. Just remember though, it’s not all about the trophy. The greatest things are the memories you’re creating and the relationship you are building with your son.
Oh, and the trophy is nice to have too.
VERY IMPORTANT—Before jumping to the tips, remember that this is a father/son collaboration and it’s your son’s race, not your’s. Yes, you will participate with building the car, but remember to involve your son all throughout the process. The rules state that the car must be substantially built by your son. The way I handled this was getting my son’s input on the car’s design and then allowing him to do the rough work. I would guide him and then help perform the fine tuning and tweaking.
NOTE: You and your son please read all the tips below before you start building your car.
Tip #1 Get educated
. Find books, websites, and tap the minds of other, more experienced dads. You’ll be surprised at the resources available. I wouldn’t be surprised if somewhere someone wrote their doctoral dissertation on how to win a Pinewood Derby Race. Some packs hold workshop days, where dads can come, along with their sons, to use loaned out tools and get important pointers on car design and contruction.
Tip #2 Read the official Cub Scout Pinewood Derby rules
Believe me, there is nothing more disappointing than coming to race day, and discovering that you did something that violated a rule and you are immediately disqualified. Review these important rules with your son.
The official rules will give the allowed dimensions for the wood block, the wheel base, clearances from the track, etc. They are also very specific on what you can or can’t alter. For Cub Scouts Pinewood Derby you must use the official kit specified for Cub Scout competitions.
Tip #3 Don’t worry about aerodynamics
. People spend way too much time on how a car is shaped, but we’re only talking about a 7 inch piece of wood, traveling a very short distance, and with a speed of a few feet per second. Having said that, my son and I always preferred the wedge-shaped design, only because it looks interesting and it leaves plenty of space toward the back, where we liked to place our weights.
Tip #4 Your biggest obstacles are friction and misalignment
I know, aerodynamics addresses friction with the air, but this is negligible compared to wheels touching the track, wheels spinning on the axle, wheels touching the side of the car, or the wheels touching the race lane guide.
Tip #5 Start with a block of wood that is square
. Use a small t-square and check all around for evenness and squareness. If it’s not square, borrow a friends table saw and safely square things up. If you have access to a planer, you could run it through there. Do this safely or ask a friend to do it for you. And be VERY careful you don’t alter the dimensions of the block such that it violates any rules.
Tip #6 Make sure the holes for your axles are perfectly aligned
I’m talking about hole locations and perfectly drilled holes. Some like to glue the nail axles in the pre-sawed slots. I highly recommend not doing that because the axles can become much less stable. The slots can be used as a guide to maintain proper dimensions, but drill your holes on the opposite side of the slots. Make sure you mark your holes precisely on both sides of the squared-up block of wood. I created a wood template that helped me get the holes precisely marked and drilled. Shop around; you might be able to buy a jig or template that helps you with this step.
Tip #7 Offset one wheel on the front a little higher than the other three
Check the rules, but this was allowed when we did Pinewood Derby. By taking one wheel off the track’s surface, you’ve reduced a friction point. But this could affect the car’s tracking down its race lane. I’ll discuss tracking in a later tip.
Tip #8 Use a drill press to make your holes
It’s the only sure way to get a perfectly straight hole and a hole that is square with the wood block. Drill these holes first before you do any shaping to the wood block. My son and I would performed this step first before giving the car a wedge shape. Drill a hole the size of the nail or slightly larger, but you want the nail to fit snug. Practice with a scrap piece of wood before you drill into the real thing. (Can’t afford a drill press? Buy the affordable Dremel Rotary Tool and associated Work Station Press
.)
Also, remember to drill the holes from both sides rather than drilling a hole completely through the wood from one side. These smaller diameter drill bits tend to flex and they can begin to travel through the wood so that the hole is no longer perpendicular with the wood block.
Tip #9 Clean up and polish the axles and tires
Your axles and tires have come off a manufacturing line, so they will have imperfections and/or extra material–flashing or burrs from injection molding–that increase friction. Always check the official rules to understand what you CAN or CAN’T do to the wheels or axles.
The common tools needed for this: a drill press or Dremel tool, a triangular shaped file, several fine sandpaper grits (use wet/dry type sandpaper), some scrap cloth, and polishing material.
My son and I turned again to the Dremel Rotary Tool and also the Work Station Press
–both very much worth the expense. We would place the nail into the Dremel chuck (tip first) and snug the nail down. This leaves the nail head facing down. Take the file and with the nail spinning, gently file off any extra metal (left over from the manufacturing process) under the nail head. Then, have your son take strips of wet sandpaper and, with the nail spinning, sand the nail shaft and under the nail head. Use several fine grits, and then finish with the cloth and some metal polish. Always, always observe the safety rules and wear your safety glasses.
Check your plastic wheels also, and make sure they are free of any injection molding imperfections that might create friction or vibration for your car. You and your son can do some light sanding on the wheels, but the rules state that you can’t alter the tread. Also, check the rules on what you can do to the hole of the wheel. The holes should be free of imperfections and work some graphite down into the holes. Make sure you and your son follow the rules carefully on wheels and axles.
Tip #10 Wash your wheels and nail axles in soapy water to remove any left over polish or residue
Allow to dry and then apply graphite lubricant to all surfaces. I do this by cutting open two graphite tubes and dumping the dry graphite into a sealable sandwich bag. Then I dump the wheels and nails in the plastic bag so my son could work the graphite over all the surfaces. Read the rules, but I believe it is allowed to use the graphite to polish the wheels.
Tip #11 Test how well the wheels spin on the axles
I know, this a little extra to do, but I usually buy two kits, and I’ll try different axle/wheel combinations until I can select four axle/wheel combinations that produce the longest spin (well, three combinations if you decide to move one wheel off the track). The longer the wheel spins on the axle, the less friction is present.
Tip #12 Now, add weight to the car and bring it up to the maximum allowable weight of 5 ounces
This means you need to buy or borrow some scales that measure ounces. I bought an inexpensive electronic scale from Walmart. There are two concepts you need to remember here—the maximum weight and the location of the weight affect your car’s potential energy. Once the car begins moving down the track, that potential energy turns into kinetic energy. The more potential energy means more kinetic energy, which translates to a faster car. So here’s an opportunity to share some science or physics concepts with your son.
Tip #13 Apply additional weights toward the back of the car
This may not be valid for all tracks, depending on the track’s shape, but most Cub Scout Pinewood Derby tracks are probably shaped a consistent way. So placing the weight toward the back helps increase that potential energy I talked about in Tip 12.
You can attach the weights to the car however you want, but most people use super glue. Other folks use weights that can be screwed into the wood and recessed under the car. You don’t want the weights coming off or shifting during the race. I like to drill into the middle of the wood block and hide the weight. I do this by using cylindrical weights and wood putty. It just gives the car a cleaner, sleeker look. Check with your son and ask how he would like to attach the weights.
I also like to make sure the whole car (with weights, axles, and wheels applied) balances around a point 1.5 inches forward of the rear axle. You can test this by placing a pencil one inch forward of the rear axles and shift weights some to make the car balance. Do this before you glue the weights in place.
Remember—don’t exceed the 5 ounce limit for the whole car. You won’t be allowed to race until your car is exactly 5 ounces or under. On race day, I like to use hobby putty for making slight weigh adjustments. The putty can be stuck onto the car just about anywhere and stays in place fairly well.
Don’t be surprised if the official check-in scale is slightly different than the scale you used at home. If your car is over the limit, remove excess hobby putty or drill out some of the wood or gently remove some of the metal weights. Use the hobby putty to add weight back if needed.
Tip #14 Test how the car tracks
Go ahead and gently push the axles on your car along with the wheels. Don’t glue anything at this point. Take a 4 to 5 foot long board that is straight. Draw a straight mark down the center or stick a piece of tape down the center. Incline the board slightly and place the car on the higher end. Square it the best you can so it’s aimed down the board’s center line, and release. Watch the car from the back and see if it veers much from the straight line or piece of tape. Also, look for any weird vibrations. You want a car that tracks straight and glides smoothly down the board. Take turns with your son on releasing the car, and one of you sit on the downhill side with a pillow to cushion the car when it comes down the board. This prevents any accidental damage to the axles.
If it tracks way off center, your son has one of three options: 1) Swap the wheels around. 2) Start over with a new block of wood. Or 3) Gently and slightly bend the front nail axle(s) until it tracks well. DO NOT–I repeat DO NOT bend the axle while it’s in the block of wood. Doing this could either break your wood or make your axle hole bigger. A bigger hole means a misaligned axle or potentially a wobbly axle. So I place the nail in a padded metal vise, and with finger pressure give it a slight bend. Place it back on the car and perform the board experiment again. Keep making adjustments until the car tracks pretty straight–and smoothly–down the board.
Tip #15 Apply the finishing touches
If you decide to glue the axles in place (which I don’t), have your son apply any paint to the car before you do this. We liked to use a glossy spray paint and usually went with 2 to 3 coats, allowing each coat to dry in between applications.
If you are competing for best of show, then you might not need to put quite as much effort in these speed tips. Best of show can be just as fun and challenging as the speed competition, but my son and I always leaned toward speed.
Tip #16 Attend the trial runs
Most packs will have a trial run the night before or the morning before the big race. This is a great opportunity to make sure your car qualifies and to make any last minute tweaks.
Tip # 17 Volunteer to maintain or set the track up
You may not have thought about this one, but the more you and your son can learn about the track, the better Some packs may handle this differently, and only allow non-participants to set up the track. But take advantage of the opportunity if it’s available.
Tip #18 Carefully store the car before race day
Explain to your son that if he or his siblings play with the car, they could accidentally bend an axle or mess up allignment. Caleb and I would always store our cars in a shoe box and we would place stuff around it to cushion it.
Also, it’s important to remember that if you win the pack race and advance to the division race, there is a time lag between these races, perhaps many days. Store the car somewhere, but I do recommend pulling the axles and re-polishing them and reapplying graphite to all surfaces. Also, double-check the car’s tracking. So it helps if you DON’T glue your axles in place to start with. You may be asking–why go through all this? As the car sets, the surface of the axles may develop some slight corrosion. This can affect the car’s speed. Believe me—My son and I learned this the hard way.
Well, I hope these tips will be valuable to you and your son. Whether your son wins or loses, remember that Pinewood Derby is such a great learning opportunity. Your son will learn how to design a winning car, use tools, work with his hands, help others along the way, cheer for his fellow scouts, and demonstrate good sportsmanlike conduct.
Good luck! I can’t guarantee your son will win first place by following these 18 tips, but they should keep him far, far away from last place. And drop me a line or leave a comment if you found these tips to be helpful.

Are you starting up a new shop? Want to work safer in your shop? To help you answer these questions I've put together a 2-part checklist -- Home Shop Safety & Tool Checklist.
I will also send you updates of my latest woodworking and DIY projects. You can get all this by subscribing to my free email newsletter.

