In this post, I will show you 5 ways to control dust in your shop so that you can stay healthy, wealthy, and wise.
I’ll let you do the research, but I think we all know that breathing in wood dust isn’t good for us in the short run or the long run. Long term it could lead to serious health issues. Short term it could lead to allergies and sinus problems. Different wood species — especially some exotic woods — may produce an allergic reaction. Those allergic reactions will vary from person to person.
And for long-term effects, it’s not just the dust we can see with our eyes, but also the dust particles you can only view through a microscope. They continue to drift around in the air long after you’ve sawn that board.
I’m not a scientist or medical expert, but here are 5 ways I like to address the dust problems in my shop.
1 – Wear a Dust Mask
This is probably the easiest way to protect your lungs from all kinds of dust particles. There are many dust masks out there, but some will give you more protection and some less. The good thing is they are relatively cheap and you can wear it all around the shop and with any tools that make wood dust. So at minimum, you need to start with a good dust mask.
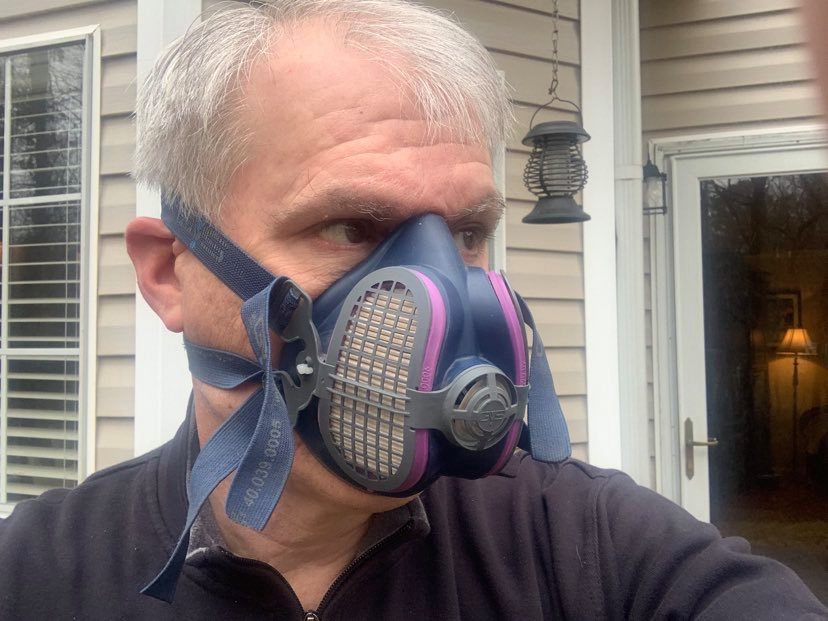
I’ve tried many dust masks over the years. I’ve tried the 3M products you find in your local home improvement stores, but they were either too bulky or I had problems with them fogging up my safety glasses. About 2 years ago I discovered a dust mask called the Elipse P100 dust mask (shown in photo above). The NIOSH P100 rated filter captures 99.97% of 0.3 micron airborne particles. It’s compact and the padded gasket forms a great seal around my face so my safety glasses won’t fog. It’s also very easy to breath through these dust masks. This dust mask cost me around $30.
So, bottomline — get a good dust mask. You can’t put a price on your health.
2 – Get a Good Shop Vac
The second all-around effective way to controlling dust is to invest in a good shop vac. Over time, you will have sawdust (along with chips and shavings) accumulating on your shop floor, benches, and really any surfaces where dust can settle. A shop vac is a great way to keep these areas clean and control dust creation at the source.
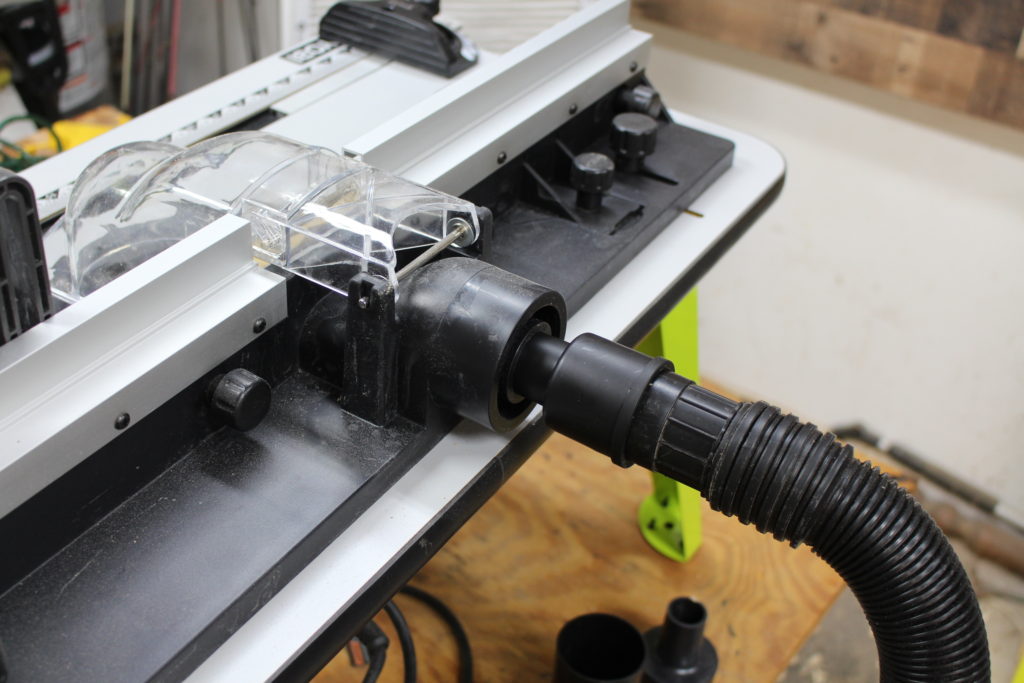
Many tools these days come equipped with a dust port and you can usually hook that dust port directly to your shop vac. In the photo above you can see how I have my shop vac connected to my router table. I also have a smaller shop vac dedicated to my miter saw, since it creates a lot of sawdust and I use that saw frequently.
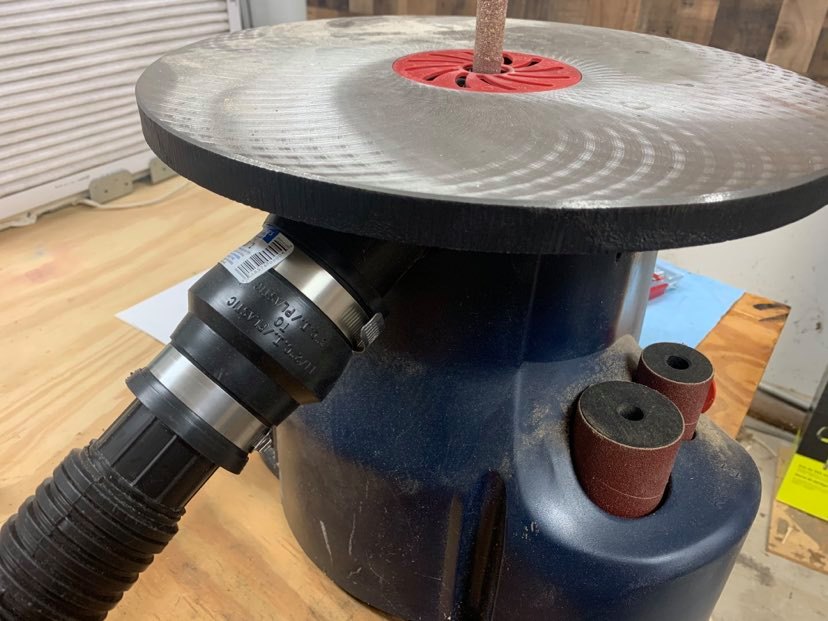
If your shop vac hose doesn’t exactly fit the dust port on your tool, you may have to buy some adaptors or do some manipulating to make it work. In the photo above, you see an adapter I bought at Home Depot so I could attach my shop vac to the oscillating sander. I found this connector in the plumbing section.
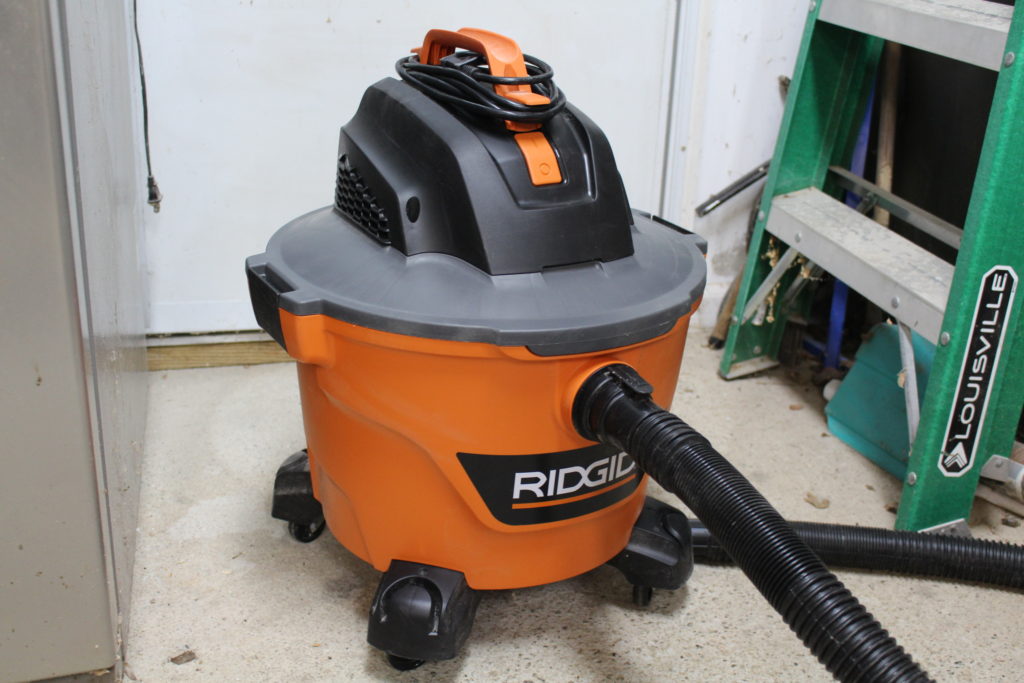
The shop vac is also great for general clean up. Mine comes with wheels and a long flexible hose (see photo above). This is the same shop vac that I hook up to the router table and other tool stations.
My shop vac is a Rigid. It’s a 9 gallon, 4.25 peak HP shop vac. It came with the long flexible hose, but I had to buy some other attachments separately. This costs me $70, but it’s worth every penny.
It’s also good to have a broom to get up large quantities of dust or wood chips. I keep a 5-gallon bucket handy to dump this into. Keep in mind though that sweeping can stir up a lot of fine dust into the air of your shop. So do it sparingly.
3 – Invest in a Dust Collector
A dust collector is good for the major dust-producing and shaving-producing tools in your shop. I have mine hooked to my lathe which I use fairly often. It not only sucks away the very fine particles, but it also vacuums some of the bigger chips and particles. This helps to keep my workstation cleaner. However, a lathe does produce bigger shavings and it is difficult for my dust collector to capture all of it. I still have to use my shop vac to clean around my lathe workstation.
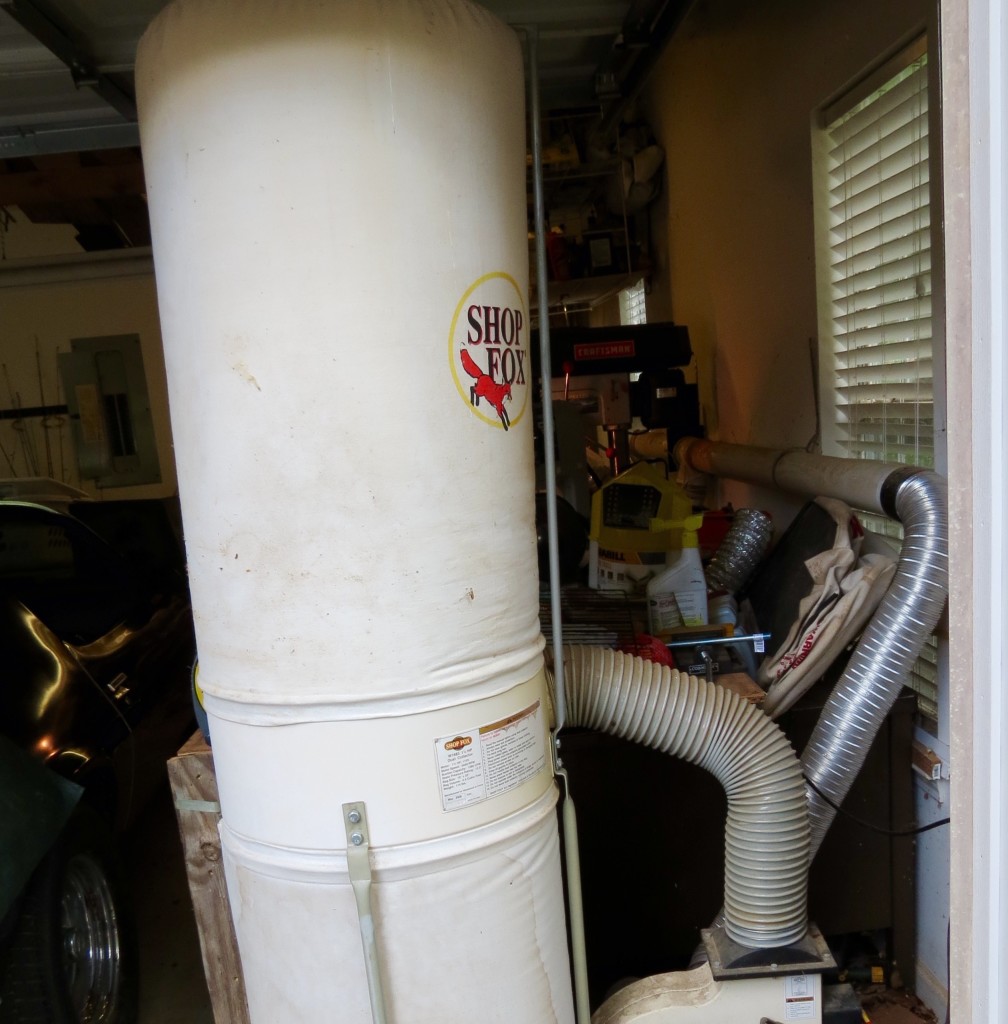
I use a 1.5 HP Shop Fox dust collector. It sits in the corner of my shop and takes up about a 3 ft by 3ft area. I’ve hooked up a 4 inch hose and run it down the wall of my shop to a hood mounted by my lathe. My plan is to eventually hook up another 4 inch hose to run to my table saw.
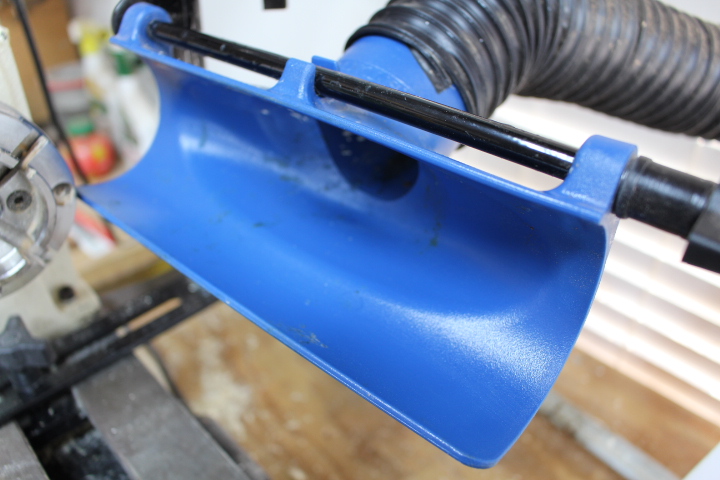
In the photo above, I’m showing the hood or scoop that mounts next to my lathe. The hose attached to it, goes back to my 4 inch hose that goes to the dust collector.
So the biggest challenge I’ve found with these larger dust collectors is the mounting and routing of the hoses. This is another good reason to have a shop vac that you can hook to your smaller tools that have the smaller dust ports. Of course, you can buy adapters to hook the bigger hoses to the smaller dust ports. Most of the hoses and other dust-collector accessories are found in woodworking stores.
Honestly, a dust collector system can be expensive (mine was somewhere in the $400 to $500 range) and most woodworkers probably don’t start with these from the get-go. That’s why I suggest starting with a good shop vac.
But if you’re using your shop regularly and want to keep it clean long-term, think about investing in a dust collector. You’ll just need to think about a good layout plan for your shop. And the two biggest questions are: where will you put the dust collector and how will you route the larger hoses to your tools?
Bigger shops will — most likely — require more powerful dust collector systems. So then you’ll need to look at the horsepower of the motor and something called CFM (cubic feed per minute). Different tools have different CFM requirements depending on the shavings they put out. And the performance of your system also depends on the size of the main duct line going back to the collector.
You will also need to install gates (basically sliding doors) that shut the dust collection system off to your other tools. This will give your system maximum performance with the saw or tool your are using at the time.
There are lots of tips and articles out there about dust collection systems. Here is one from Wood Magazine that looks like a helpful resource. My shop is 20 ft by 20 ft, and the 1.5 HP dust collector has worked just fine. I wouldn’t recommend going lower than 1.5 HP. My main duct line is 4 inches.
4 – Add a Dust Filtration System
This is different from a dust collector. This device is somewhat equivalent to an air purifier you might place somewhere inside your home. It’s specifically designed for workshops and will filter those small harmful particles I’ve been talking about.
Like an air purifier, you will run it regularly and even when you’re not working in your shop. A lot of them are designed to be mounted on the wall or ceiling. Think about it this way: you don’t wear your dust mask every time you go into your shop — right? However, the fine dust particles are still there floating around in the air. The filtration system is another layer of protection to keep the air in your shop clean.
Like dust collectors, these filtration systems can be expensive, but they may be worth it if you work in your shop regularly. I don’t personally have one because I can open my garage door and allow the air to circulate to a greater degree than maybe a closed shop.
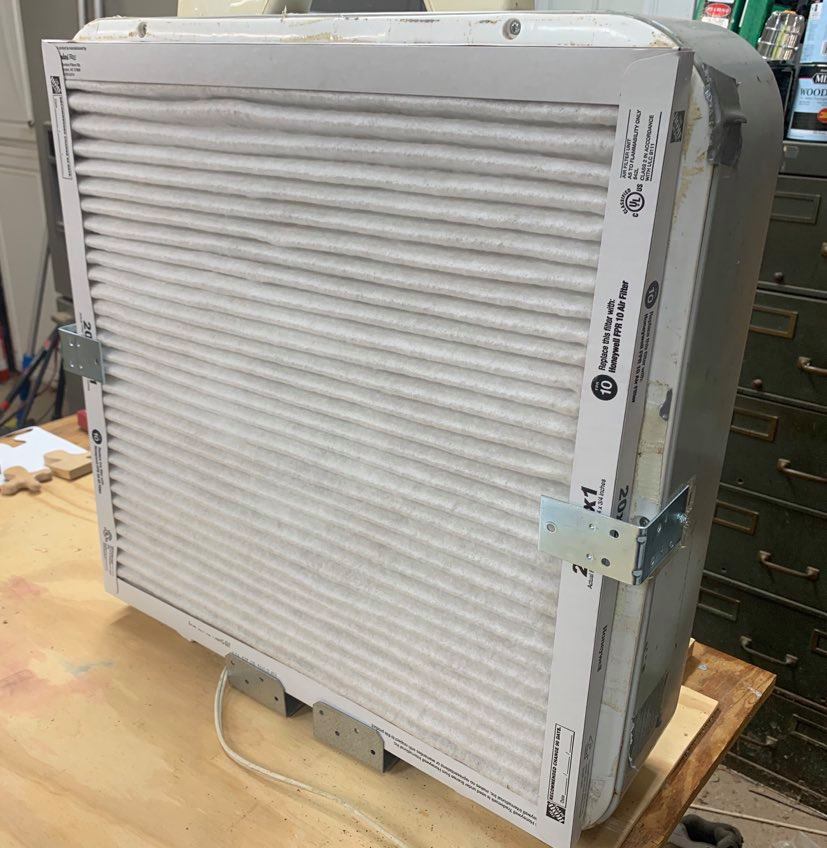
I did however make a homemade filter just by attaching a regular air filter to a simple box fan (see above photo). I simply attached a few metal brackets to the fan with sheet metal screws. Now I can slide the 20X20X1 FPR 10 filter in an out as it needs to be replaced. It’s probably not as effective as a $400 filtration system, and I have no way to compare them, but I believe it will help to some degree.
5 – Work Outside
Granted, this may not be possible if you have a more enclosed shop. My shop is in my garage, so I can easily open the garage door and roll my table saw outside along with other tools. By doing this, I keep the dust way down in my shop, and I can easily get my yard blower out and clean up my mess. In the photo below, you see my daughter working on a project and using the orbital sander just outside the workshop. You also see another glimpse of my dust collector to the left.
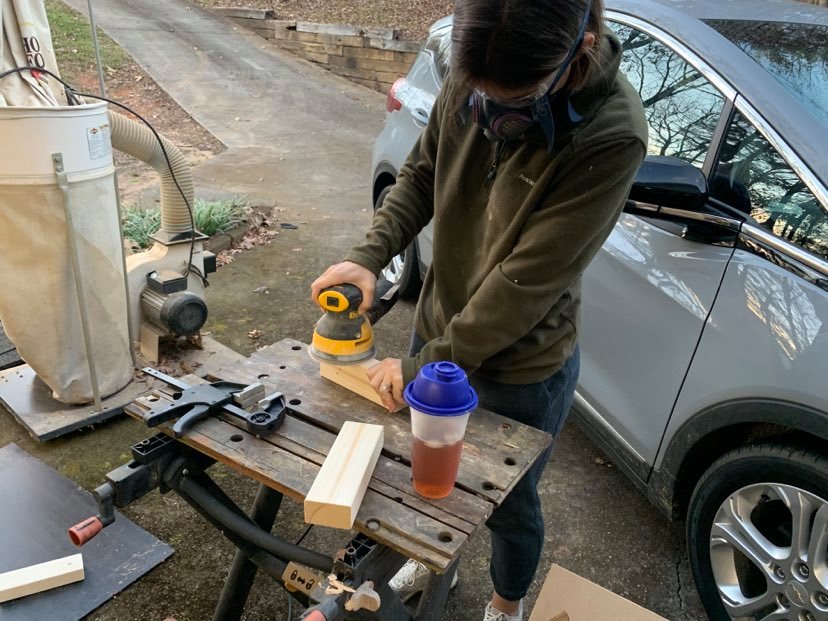
For a future advancement to my shop, I want to build a mobile work table with all my different sanders (belt, oscillator, disk) mounted to it. Then if the weather is nice, I can just roll that table out onto the driveway and do my sanding there. I’ll still wear my dust mask, but getting outside will keep my shop a lot cleaner.
Other Tips On Controlling Dust and Its Effects
If dust particularly affects you with allergies or irritations, then you might want to visit your doctor and see what he/she suggests. They might be able to do some allergy tests and recommend allergy medicine to help mitigate the effects.
Some dust will not only produce an allergic effect on your respiratory system or sinuses, but some can cause reactions to your skin. While there are some good resources that will state possible toxicity and allergic reactions of different woods, I’ve found that you can only know through experience. Everyone is different and we all react differently depending on our biological makeup.
Not all woodworking is equal. Some projects produce more dust than others. If you do woodcarving, for example, you may produce zero dust. I will often use pre-cut or dimensioned lumber to help keep down on the sawing, planing, and milling. This takes some extra planning, but if I can avoid cutting lumber, I will.
Other things we expose our lungs to. If you decide to do wood burning, then you have to breath in smoke. If you apply paint or finishes, then you will breath in fumes. So, in those cases you need good ventilation in your shop. One option would be a simple fan and use it to blow across the work area. Or, again, just take your work outside.
Having a good shop apron can also help. With an apron, you accumulate sawdust on the apron and when you’re done just leave it in the shop or take it outdoors and shake it off. This will help cut down the amount of dust that sticks to your clothing and may avoid bringing it with you into your home. I also like to wear a baseball cap to keep dust and debris out of my hair.
Another health tip I enjoy is taking frequent hot showers. So after a long day in the shop, I will jump in the shower to wash away the dust and grime. It also greatly helps my sinuses by having the warm water flowing over my face and breathing in the steam. Although I can’t medically proof it, I believe that this helps cut down the amount of colds I get during the year.
Don’t Forget Fire Hazards
Another huge reason we need to keep our shops clean is the fire hazard. Sawdust is very ignitible and so you don’t want to let it accumulate in thick layers. Don’t forget to vacuum those areas behind your bench or under your bench where sawdust can easily pile up. All you need is one tiny spark landing on a pile of sawdust and your shop (and maybe house) will go up in flames. So, keep things nice and clean and have that peace of mind.
What are your tips for a clean shop?
Thanks for reading this article, and I hope it helps you!
Okay, now it’s your turn. Please leave a comment and tell me your tips for controlling dust in your shop and keeping your shop clean.

Are you starting up a new shop? Want to work safer in your shop? To help you answer these questions I've put together a 2-part checklist -- Home Shop Safety & Tool Checklist.
I will also send you updates of my latest woodworking and DIY projects. You can get all this by subscribing to my free email newsletter.


Good article, I also keep a hand vacuum nearby to quickly pick up large particle dust and chips on my bench and floor, etc, Ryobi makes a nice model that is rechargeable, powerful and easy to clean. The charging station can be mounted. This augments having my shopvac which can be bulky and somewhat awkward to move around quickly.
Thanks for the comment! I may need to look at the Ryobi hand vac. That sounds like a good idea! Thanks!