You’ve probably heard about kickback on a tablesaw. Did you know that you can experience kickback with a circular saw as well? This can be very dangerous, but the good news is that it’s very controllable once you understand the underlying cause and effect. So, I thought it would be good to put together an article on handling circular saw kickback and throw in some additional safety tips that will make your experience better with these valuable tools.
Long before I bought my Grizzly tablesaw, I always used a circular saw. And — I still do. They are an awesome tool because they’re portable and don’t take up much space in you’re shop. However, like any power tool, they come with dangers if not used properly.
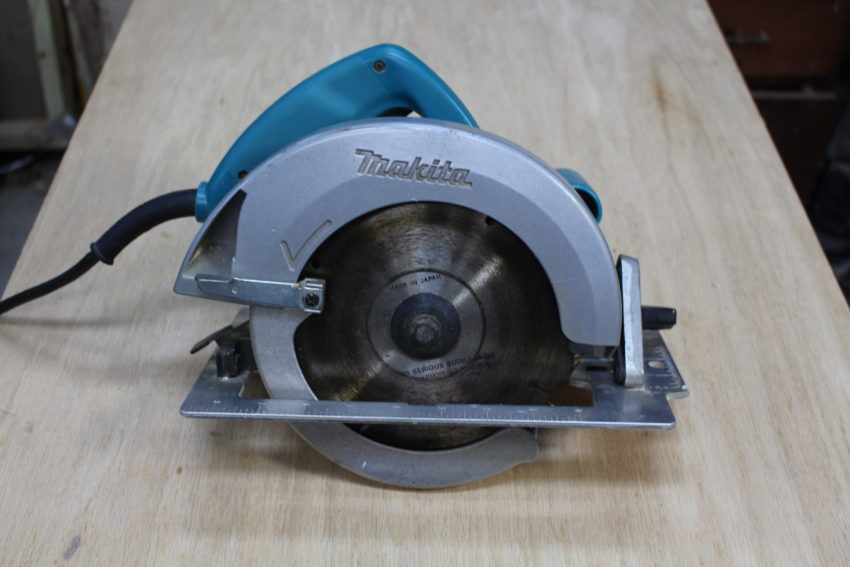
I own a Makita Circular Saw with a 7 1/4 inch blade, and it has worked beautifully for me. The first thing I did when I got my saw was to read the manual. So make sure you consult the manual for your particular brand saw. My manual also covered many additional safety tips and gave advice for making good cuts.
What is kickback?
Kickback happens when the saw blade binds or stalls suddenly in the wood and the saw gets driven back toward you.
So the key to preventing this is to make sure your blade doesn’t bind in the wood. A lot of this has to do with how we support the wood while cutting, and I’ll show you some tips a little later in this article. It can also depend on the nature or condition of the wood. Are you cutting hardwood or softwood or plywood? Does the wood have any knots which could cause problems?
If you feel the saw beginning to bind, release the trigger so the blade will stop. I recommend using some type of fence or guide for making long ripping cuts. I also believe in keeping both hands on the saw to maintain better control. Make sure you’re using sharp blades and never force the saw through the cut.
Don’t ever pull the saw out of the wood while the blade is still turning. And that holds true for most other saws.
When starting a cut, make sure the blade is not resting on the wood before you push the trigger. Keep the saw blade back from the wood, pull the trigger and let the saw blade come to full speed. Then slowly advance the saw into and across the wood. Keep the saw steadily moving and make a continuous cut across the board. You need to think about this especially for longer cuts. Can you comfortably and safely make those cuts and not lose control of your saw? Don’t allow your body to overreach and lose your balance.
Think about your body position behind the saw. It’s probably a good idea to make sure your body is slightly offset and not directly behind the saw. This is what is also suggested when pushing a board through a tablesaw.
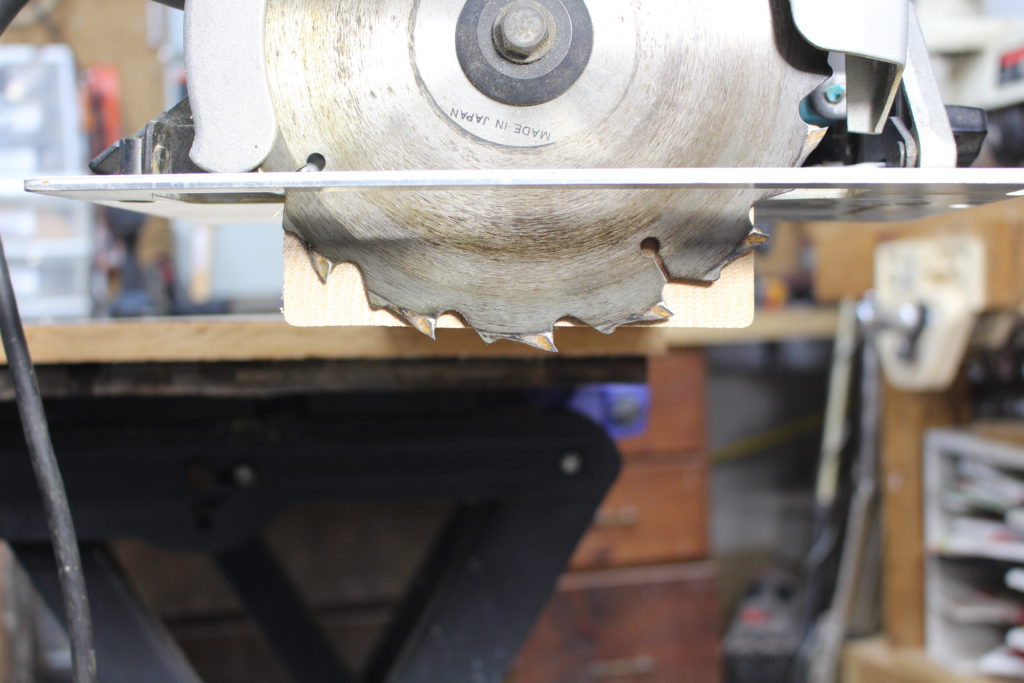
When setting the cut depth of the blade, I normally adjust the blade to extend 1/4 to 1/2 inch below the board (see photo above). If the blade extends more than that, you could increase chances of binding, and it just creates more hazards. Having less of the blade exposed is just a good all around rule.
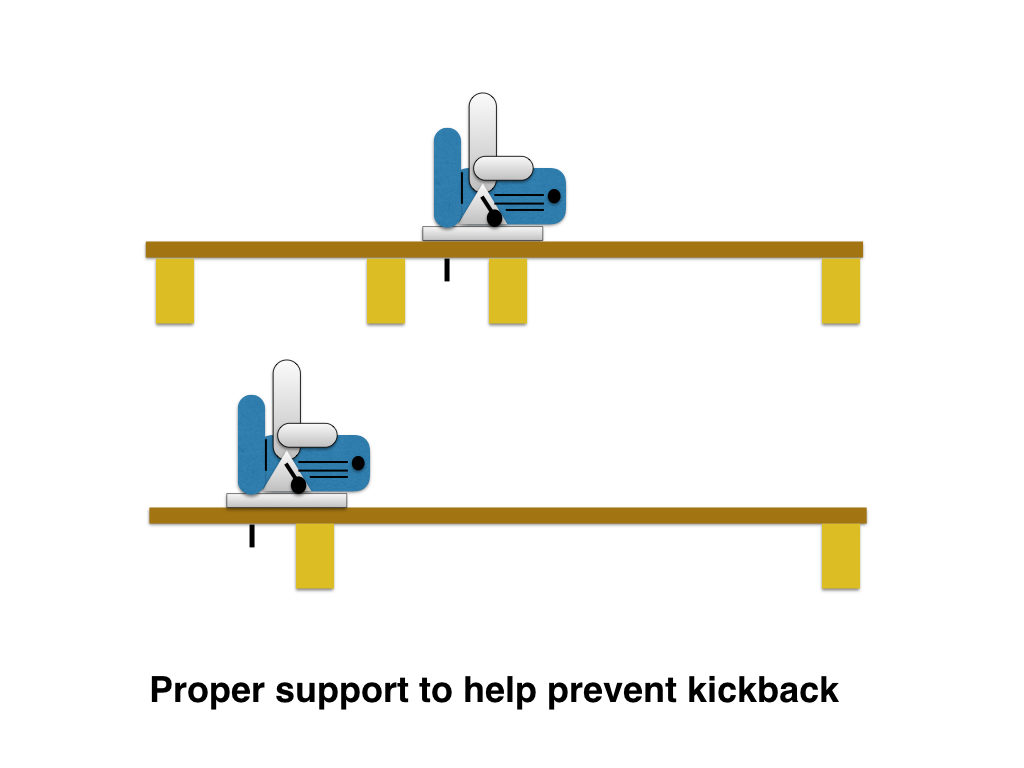
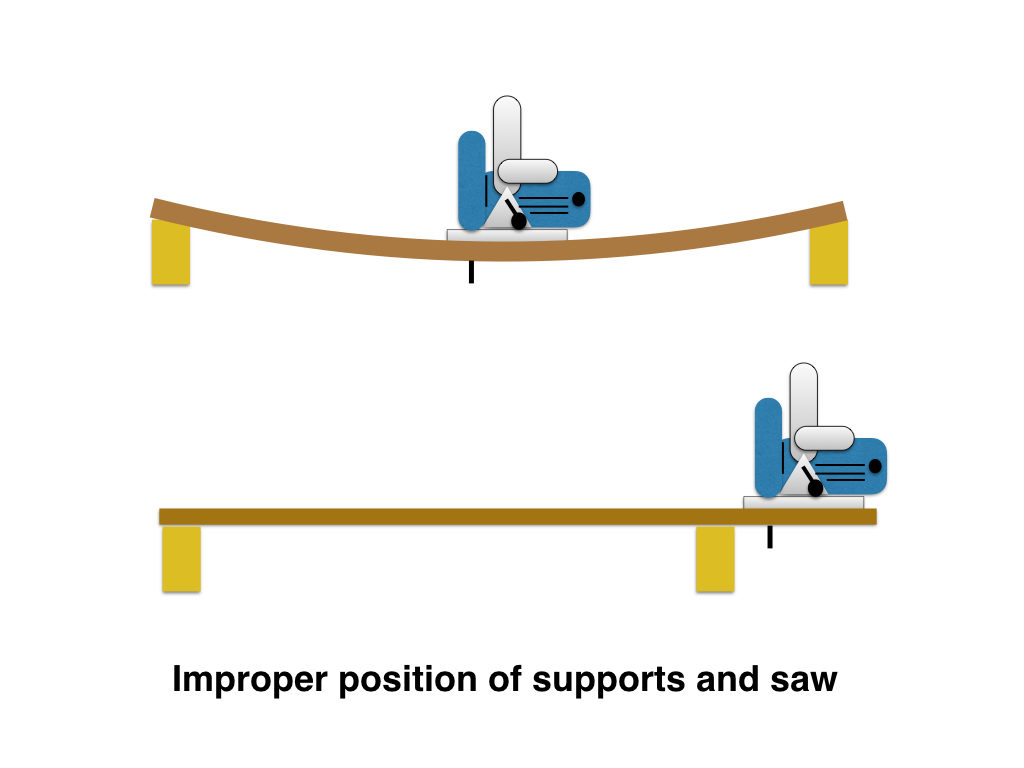
So, let’s talk briefly about supporting your wood.
Kickback will more than likely occur when cutting bigger wood panels. As a general rule, you want to keep your support as close to the cut as possible. If the saw is cutting further from your support, the more likely it will bind. That happens because the weight of the wood, the saw, and your slight downward pressure will make the wood bow. See the top 2 graphics to see what I mean. The first graphic shows proper position of the saw and supports. The second one shows a couple of improper scenarios.
Keep in mind, you want your waste piece to be able to move away from the supported piece. So, you want to clamp or secure the non-waste board onto something — like saw horses, a table, or a bench. It’s okay to let the waste piece drop, however this will sometimes cause the wood to splinter at the end of the cut.
What are some other circular saw safety tips?
I’ve already mentioned a few, but here are some more:
Make sure your cord is clear of the blade’s path. I’ve made this mistake before and wound up sawing into my cord. Fortunately, the breaker tripped instantly, and I didn’t get electrocuted. Also, you want to have plenty of slack in your cord so it doesn’t cause your saw to bind.
Use clamps to secure your wood to a work bench or saw horses. I’ve used a Black & Decker Workmate for years, but sometimes it’s just not solid enough for sawing bigger boards. The quick grip clamps or C-clamps come in handy for holding your stock.
Take some time to declutter your work area. You don’t want to have trip hazards when working around any saws.
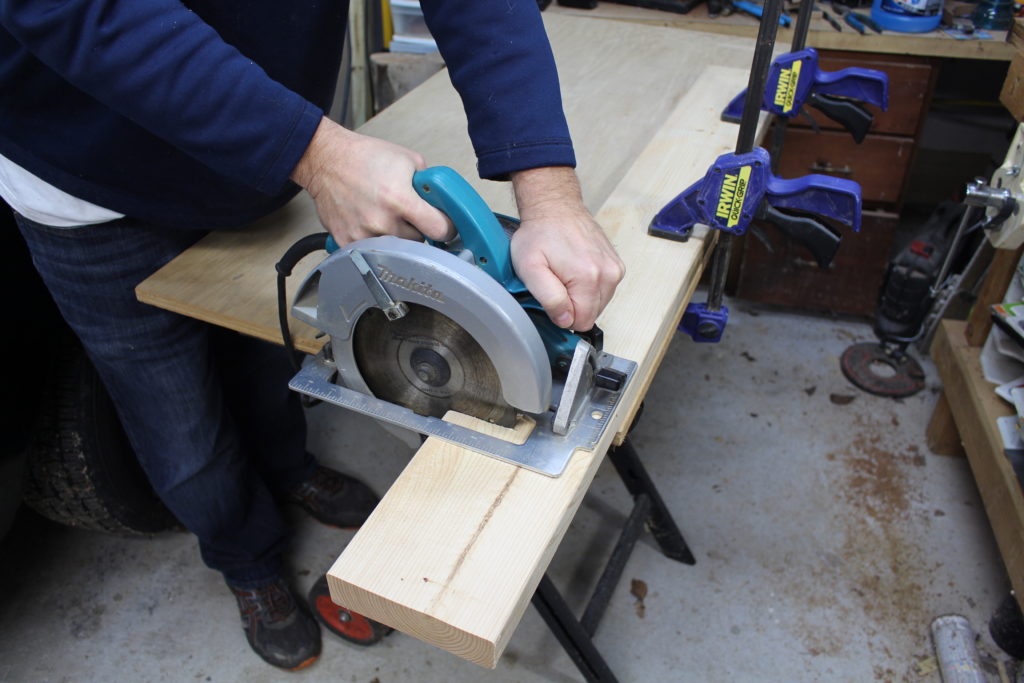
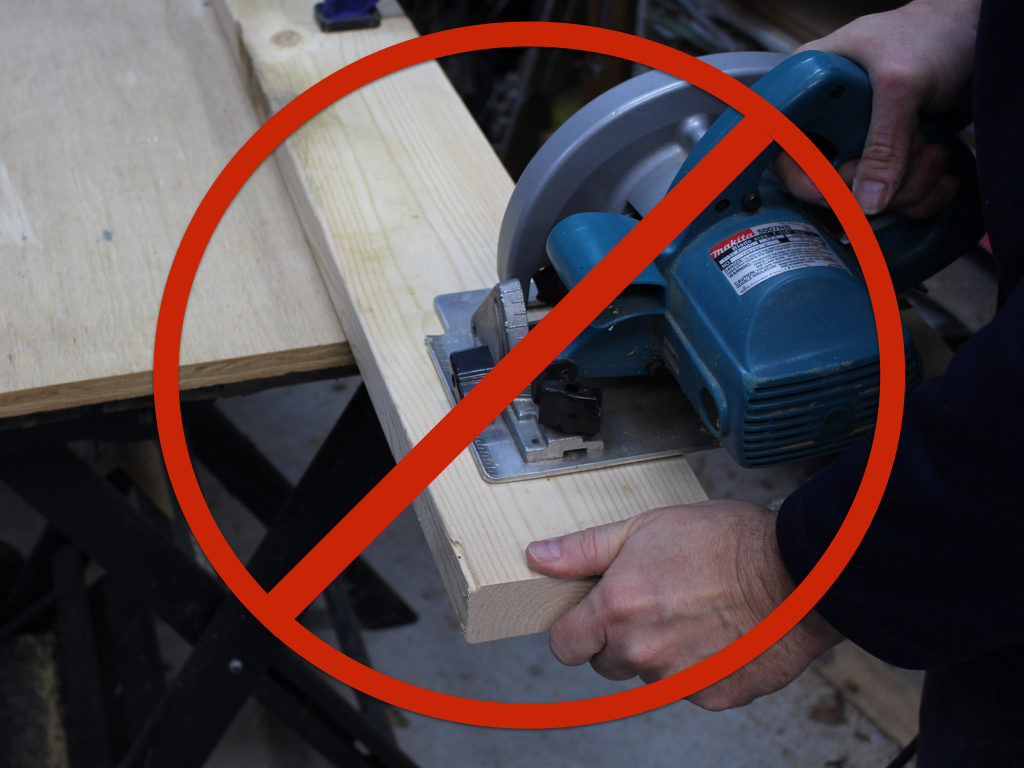
When cutting, make sure the saw base (wider side) is resting on the support side of the board being cut. See the first photo above. In my opinion, that first photo above shows the ideal setup. This way, the saw will not slip or drop off with the waste piece. Notice the clamps and my body’s position. I have both hands on the saw.
DON’T do it the way I’m showing in the next photo down. That scenario will cause the saw to bind and you will possibly lose control of your saw.
Before cutting, make sure the depth adjustment and the base and bevel adjustment are tight.
If you are sawing and the blade gets off the line, don’t try to force the blade back onto the line. This can cause the blade to bind and possibly create a kickback.
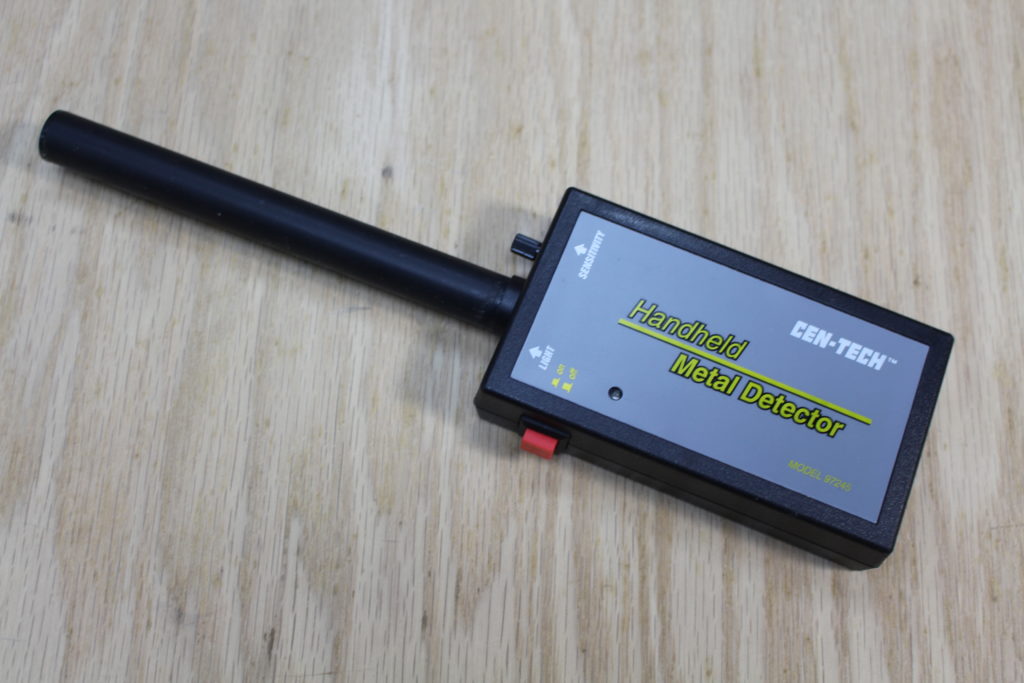
Check your board over for any embedded nails or screws. I’ve started using this handheld metal detector (see photo above) on boards I suspect may have old nails. You can get these from Harbor Freight or Amazon. They aren’t 100% foolproof, but they can help.
When the blade clears the wood, allow the guard to slide over the blade and let the blade come to a complete stop before you set the saw down. Make sure your spring-loaded blade guard is working properly. Don’t modify you saw by taking this off.
Maintain your blade. Keep your blade clean. Make sure it’s installed properly and that you have the right blade for the right application. Although some blades can be sharpened, it’s probably more practical to just replace a dull blade. Carbide-tip blades can be particularly hard to sharpen.
I know you wouldn’t ever do this, but please don’t turn your saw over and clamp it in a vise so it cuts upside down. This is very dangerous. And — this is what they make tablesaws for. Ha. Ha.
Before doing any maintenance on your circular saw, make sure to unplug the power cord.
Wear the proper personal protective gear.
Use ANSI rated safety glasses or in some cases a face shield.
Wear a dust mast and ear protection.
Steel toe boots are also a good idea, with the potential of dropping the saw or a board falling on your foot.
While doing research for this article, I discovered that some manufacturers equip their circular saws with a riving knife. This is a metal projection that fits toward the backside of the blade and runs through the kerf, hopefully preventing the wood from coming together and pinching the saw blade. It’s not foolproof, but it does help keep the wood from binding. This may only be a requirement in certain countries. I don’t think I have ever seen this feature on circular saws in the U.S.
Now it’s your turn.
I hope you have gotten something out of this post and feel better about safely using your own circular saw. Although I’ve had saws bind, I’ve never had a serious case of kickback. So, it’s been a very rare occurrence for me. But then I’m not going to get complacent and ignore the safety precautions.
Keep in mind, I’m not an expert on saw safety. Please read the manual that came with you saw to get specific safety recommendations for you saw. If you’re a total newbie (like we all once were) then find someone who can show you how to safely use a circular saw. Once you’ve cut a few boards successfully, you’ll realize how valuable this tool will be in your shop.
In the comments field, feel free to share any close calls or other tips you might have regarding kickback or circular saw safety.
If you like this article and want to get more, please subscribe to my newsletter. When you do I’ll send you a free safety checklist for you shop. You can also find me over on YouTube.
God bless and happy woodworking!
Stephen

Are you starting up a new shop? Want to work safer in your shop? To help you answer these questions I've put together a 2-part checklist -- Home Shop Safety & Tool Checklist.
I will also send you updates of my latest woodworking and DIY projects. You can get all this by subscribing to my free email newsletter.
