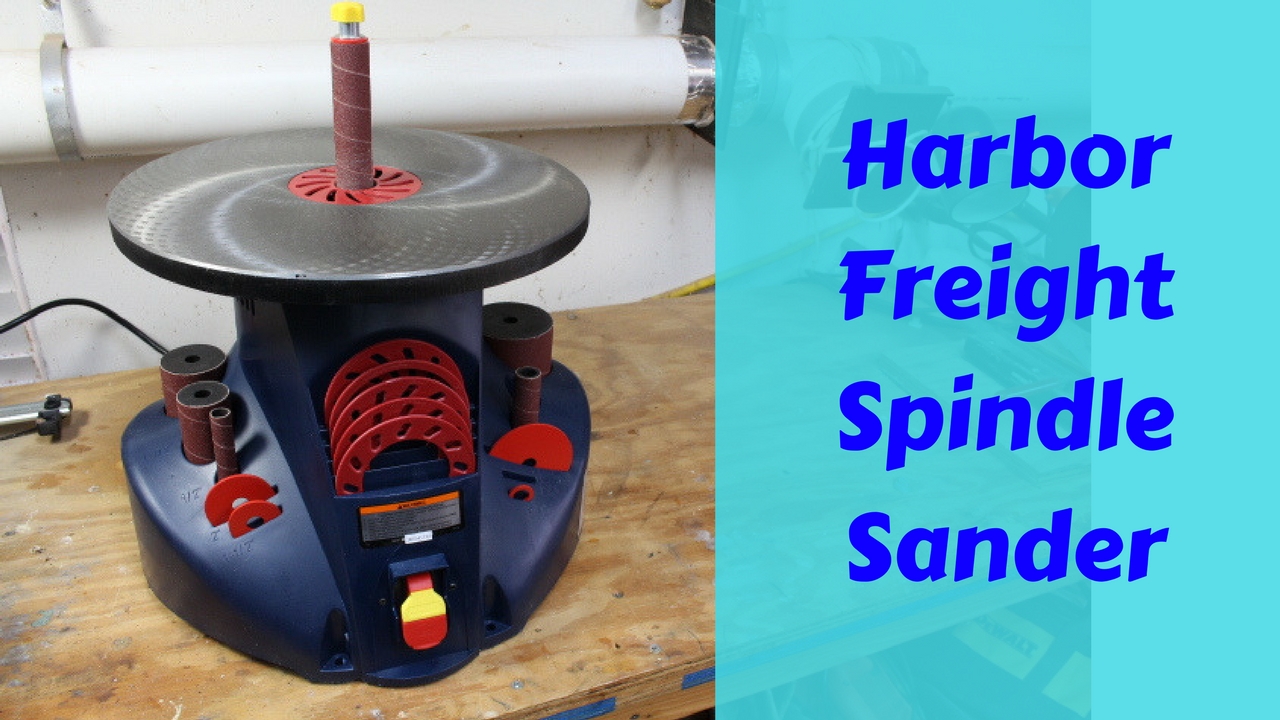
Sanding is one of my least favorite things about woodworking. It takes time, it creates tons of dust, but you have to do it to get that beautiful finish. In this post, I want to introduce you to the Harbor Freight oscillating spindle sander which I think will make your life a little easier in the workshop.
I also created a video (see below) that overviews the major features of the sander and demonstrates how to use it. (Note — this is more of an overview than a tool review. And, no, I’m not being paid by anyone for this article. These are my own opinions.)
There seems to be some debate in the woodworking community about the quality of Harbor Freight tools. Both sides have their points, but overall I like the stuff I’ve bought from there. I bought a 1 inch sander from Harbor Freight over a year ago and have not had any problems. I’ve purchased some carrying cases and they have held up over the years. I’m not saying that all their products are perfect, and you certainly get what you pay for. Read reviews and do your research before making a purchase.
That said, let’s talk about the oscillating spindle sander. Presently, it’s priced at $145, but make sure you take in the 20% coupon to knock that price down. The reviews on this tool on the HF website are very favorable. You can also get additional specifications along with a user manual download if you want to learn more about it.
The dual action spindle runs at 1725 rpm and 30 oscillations per minute. This oscillating motion will give you a smooth sanded edge. And that’s the tool’s primary purpose — sanding straight and curved edges. Primarily, curved and contoured edges.
The body of the sander is made out of a thick plastic, and the cast iron table top is very solid. It comes with 6 different sized sanding drums, all 100 grit. You can buy 80 grit, 150 grit, and 240 grit separately (don’t forget to take your coupons).
One of my favorite features is the storage compartments. Every washer, insert, and sanding drum has a storage compartment. On the back is a dust port if you want to hook to a shop vac or your dust collector system. There are 4 mounting holes if you want to lock the sander down to your workbench. However, since it’s fairly light and easy to move around, I’m not planning to fasten mine down.
Wear your safety glasses, dust mask, and ear plugs. The machine is louder than I was expecting, but not unbearably loud.
Attaching the spindles is simple and you can see me demonstrate that in the video.
I’m looking forward to using this on a wooden ring box project that I’m working on right now. I will be showing the Harbor Freight oscillating spindle sander in action for that project. So stay tuned.
Here is the video I promised earlier in the article:
Thanks for checking out this post, and please leave any comments or questions in the field below.

Are you starting up a new shop? Want to work safer in your shop? To help you answer these questions I've put together a 2-part checklist -- Home Shop Safety & Tool Checklist.
I will also send you updates of my latest woodworking and DIY projects. You can get all this by subscribing to my free email newsletter.


I really like your work and ideas and have looked at most of your videos, etc. This one has some problems.
You mat want to consider a backdrop other than the clutter in your basement. The lighting is bad, partly because there is inadequate coverage of the portion of the sander below the work table.
You make no mention of the sanding tube’s replacement. Are they available anywhere, including Harbor Freight ? This is particularly of interest to those of who may have a lengthy drive to a HF store. Along the same line, what about the availability of various grits on the tubes? Will it work with other materials ? Metal, Plastic, etc.
Your site stresses shop safety, which I think is outstanding. However, tossing the instruction manual to the side isn’t conducive to shop safety. You might want to stop when the manual is revealed, advise the folks to always read the manual before going any further. No mention of safety glasses nor using any sort of “pusher” was made.
Are there any provisions for guides or is this always a “free hand” operation. What widths of stock can this sander handle? Try some large items, then some very thin stock.
Can the sander be bolted to a workbench or work stand ? Should it be bolted down ? How long is the power cord? What is the amp rating? Using a lightweight extension cord on a higher amp tool can be bad news, but some will try it unless they’re told.
READ THE MANUAL BEFORE TRYING TO MAKE A VIDEO. Cue cards set up out of the camera’s view will help you do a better presentation. Several times it was obvious you were searching for the right words.
I REALLY LIKE WHAT YOU’RE DOING ! What I’ve written is to help, not take away from your effort.
Your friends tell you what you need to hear, others tell you what they think you want to hear.
Thanks again!
Thanks for the comment! I always welcome feedback and you have some very valid points you’re making. To be fair though, I would encourage you to go back and view the video again. I did read through the manual thoroughly before making the video (I pulled it up online to read before doing the video). Yes, I put the physical manual aside, but if you read the text on the screen I do advise people to read the manual and warn that their model may be different than mine. (I realized that because I read the manual and did some research.)
I did mention — in the subtitles — that 80 grit, 150 grit and 240 grits are available and sold separately. I may have forgotten to specify you can get them from HF. I also mention the diameters of the spindles in the subtitles.
You bring up a good question about using on other materials like metal or plastic. The manual does not specify whether you can do that or not, but I would think you could in some applications, although I would not officially recommend it here. I’m not sure if the sanding sleeves are designed for other types of materials.
I did point out in the video the 4 holes for connecting the sander down to a workbench and talked about that option. I decided I would rather move mine around because of the limited space in my shop.
I didn’t see any reference to “pushers’ or guides in the owners manual, but perhaps there is something like that I haven’t learned yet. Every video I’ve watched, folks appear to apply the workpiece to sander free style. The manual does recommend using a light touch and you want to keep the workpiece moving – don’t stay in one spot. Again, I set this up as an “unboxing/overview” video – not a tool review. So the tool is new to me, and I state that I haven’t used it yet. But please share if there are techniques out there. I would love to hear them, and I’m sure my audience would as well.
Anyway, I do appreciate the honest feedback. I know I have work to do to improve the videos, but I also know I’ll never please everyone. But I will take your advice to heart and this will help me improve on future videos. Thanks again!